
Installation of the Iptim Plugin
For QGIS to work with IPTIM, a plugin is needed. The installation follows three main steps:
1. Install QGIS
Windows:
https://download.qgis.org/downloads/
For 2.18.28 (recommended) use this link: https://download.qgis.org/downloads/QGIS-OSGeo4W-2.18.28-2-Setup-x86.exe
OS X:
https://www.kyngchaos.com/software/archive/qgis/
For 2.18.28 ( recommended) use this link: https://www.kyngchaos.com/files/software/qgis/QGIS-OSX-2.18.28-1.dmg
2. Copy the archive file into the QGIS folder
The plugin is an archive file, which needs to be extracted and copied to the QGIS plugin folder. The plugin folder varies by operations system and what version of QGIS is installed.
Windows, copy the plugin in this directory:
C:\Program Files\QGIS 2.18\apps\qgis-ltr\python\plugins
OS X, copy the plugin in this directory:
~/.qgis2/python/plugins
3. Finalize the plugin installation
After the files are extracted into the plugin directory:
- Start QGIS
- Open the menu (Plugins > Manage and install)
- Activate – then click close.
- The IPTIM logo will show on your toolbar. If the IPTIM Icon is not on your toolbar, check installation and if the plugin is activated under (Plugins - > Manage and install Plugins). For more details, look at the IPTIM Connector installation.
LOG-IN WITH THE IPTIM PLUGIN
Warning: Only one session can be active towards IPTIM. Therefore, make sure you save any work and log out of IPTIM before starting an editing session.
To log-in with the Iptim plugin:
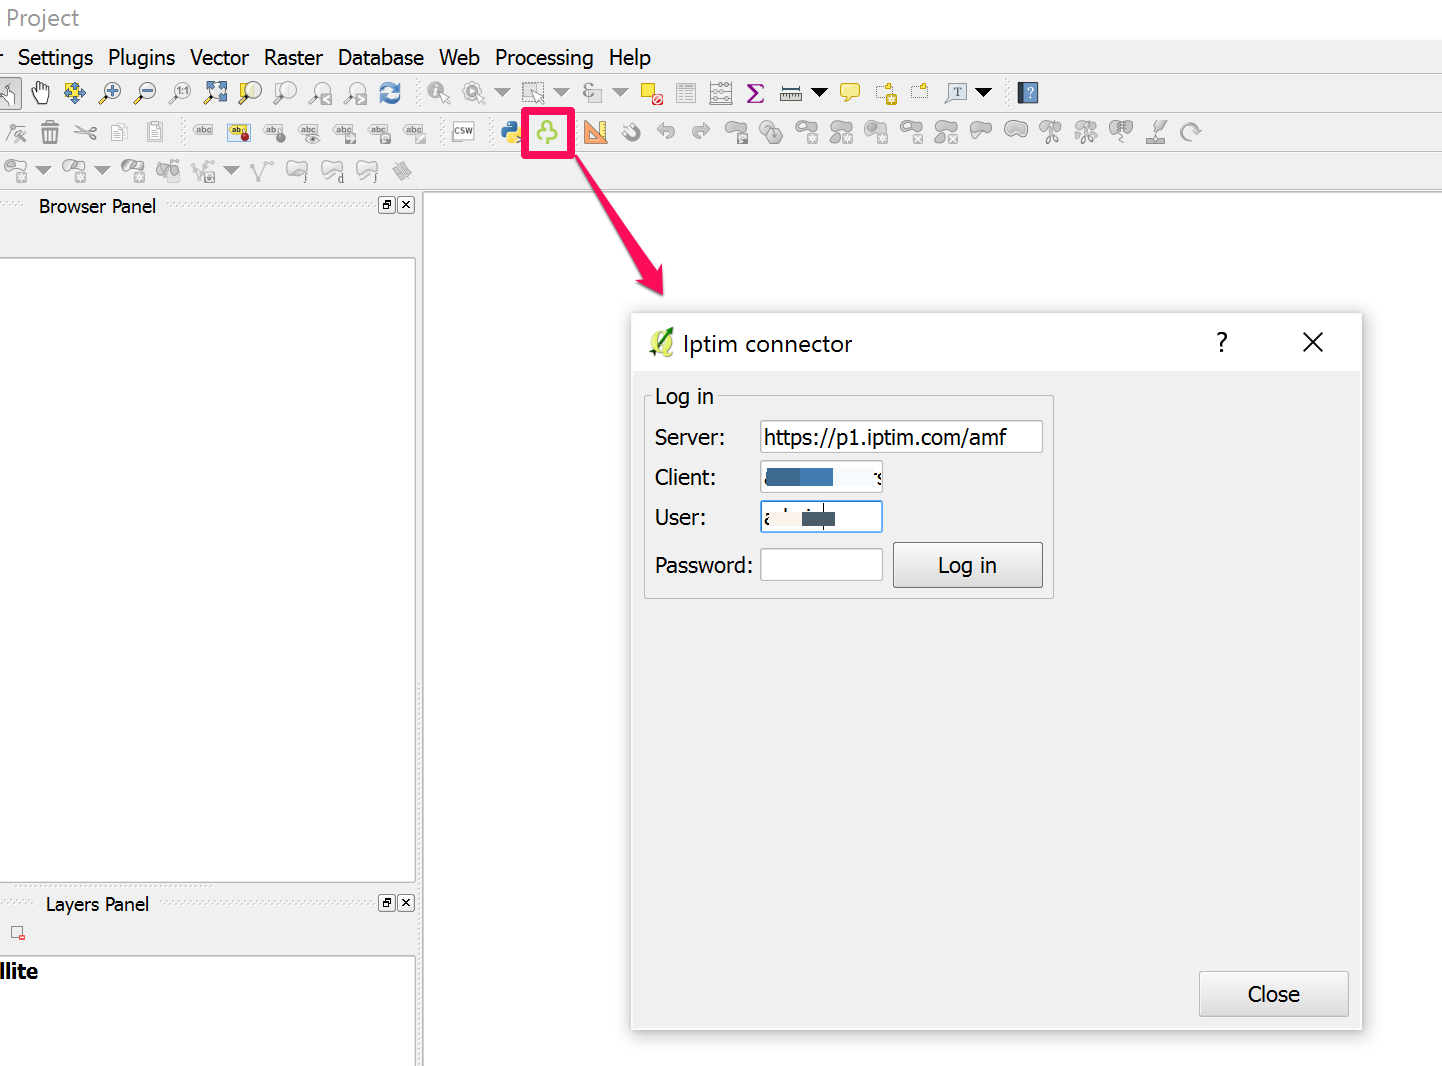
- Click the IPTIM icon
- The server and client are the same as IPTIM client
- Same username and password as IPTIM.
- Click Log in.
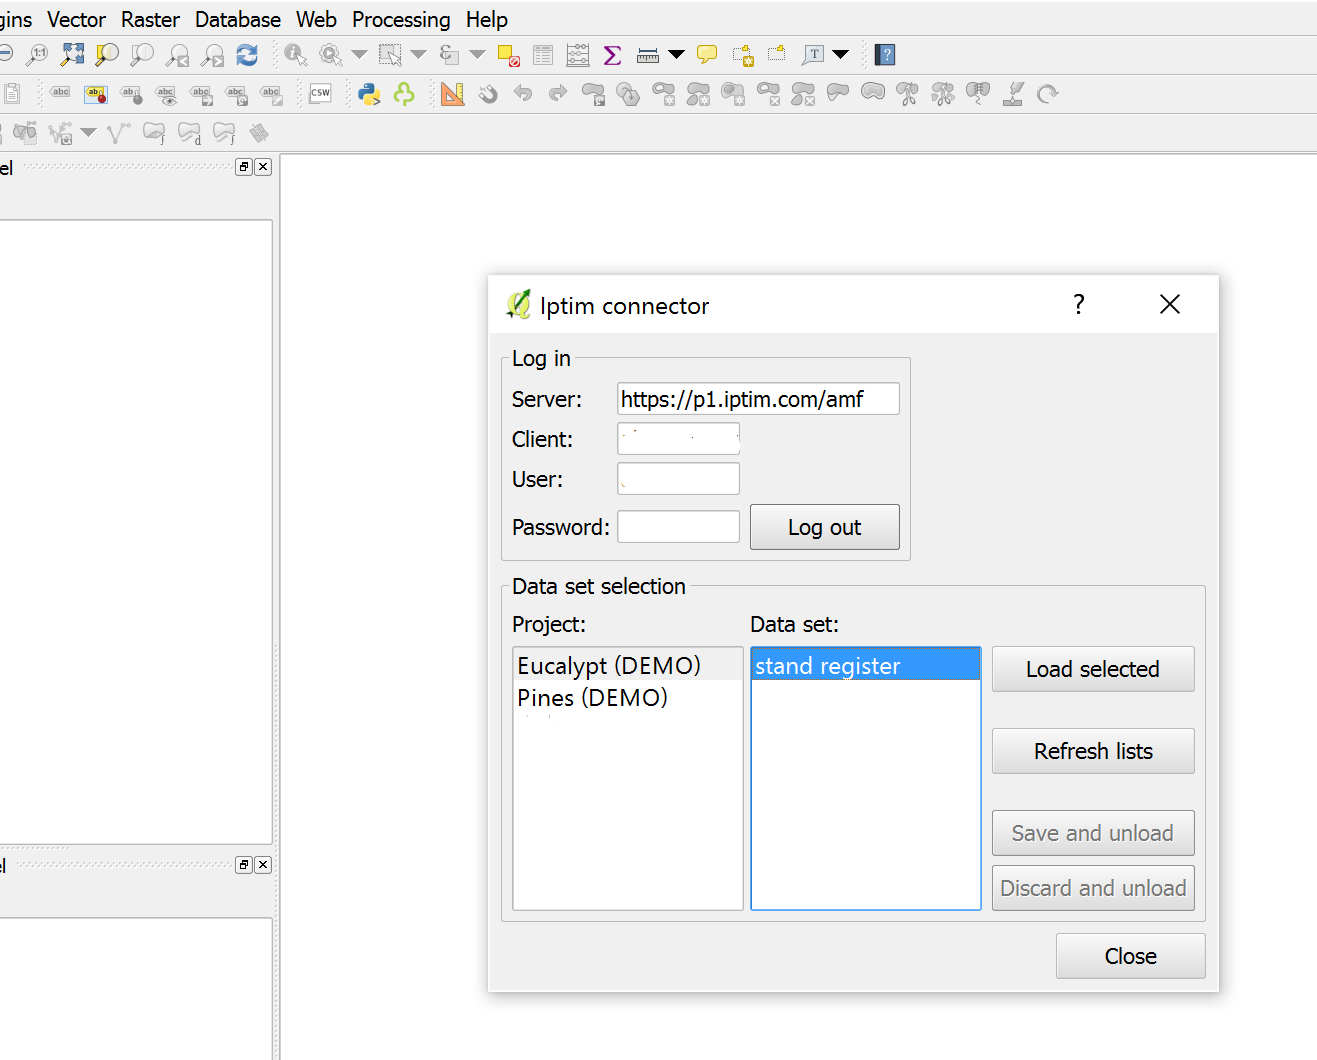
- Select the project, the data set, and click on Load Selected.
Common editing tasks
This part shows some common editing tasks in QGIS.
Add a new compartment
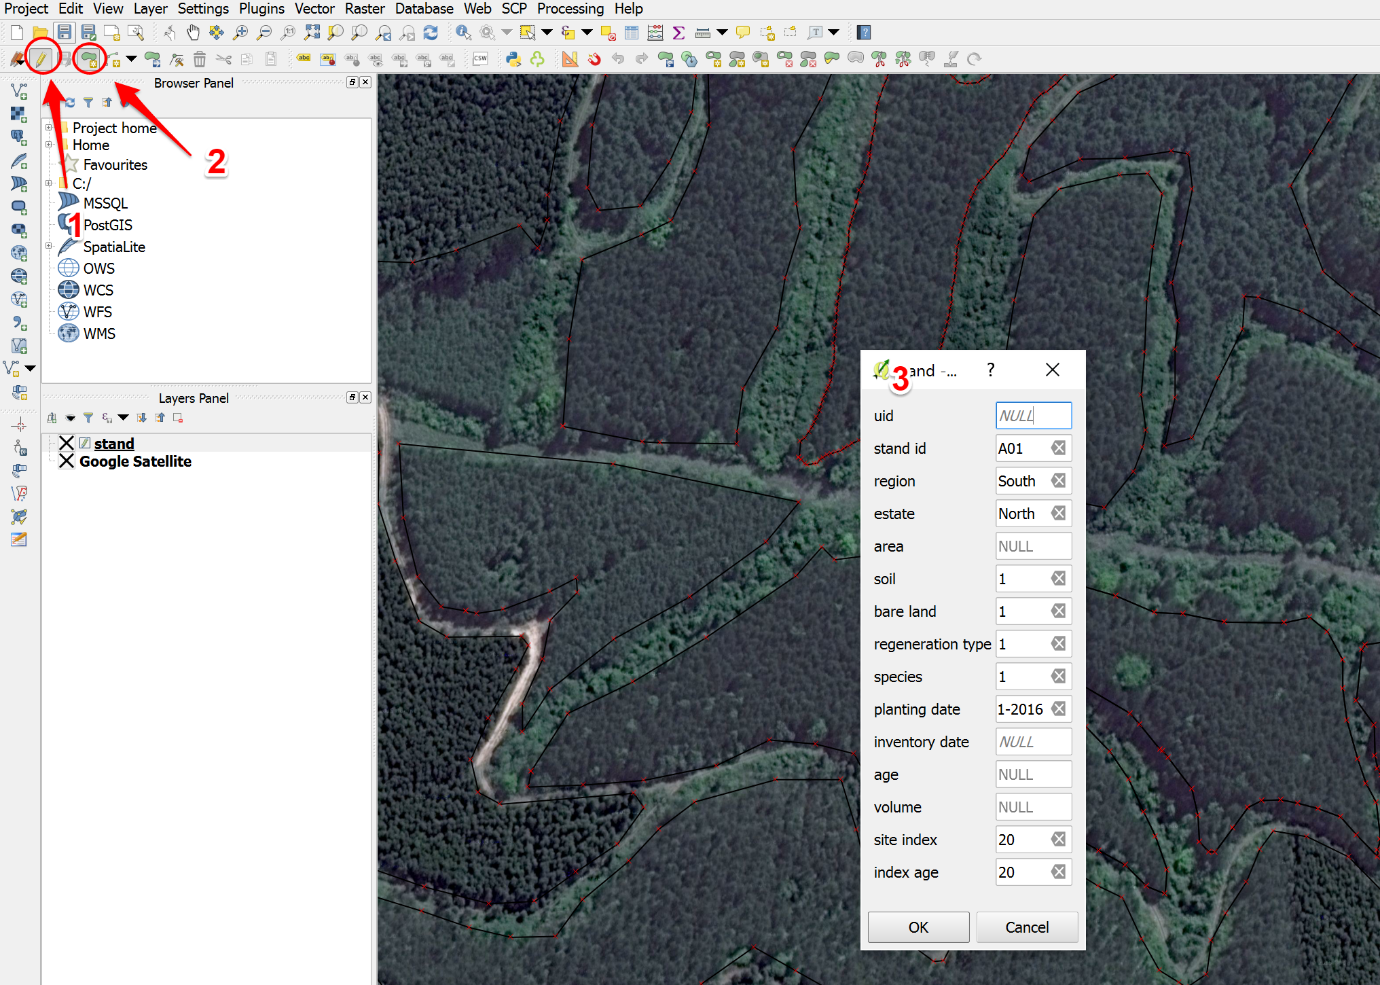
- Editing must be enabled (Toggle Editing).
- Click on the add feature tool and start marking the boundary of the compartment.
- After this is completed, right click and put in the relevant forest information. (in version 2.14 of QGIS your edits will temporarily disappear while entering stand information.) After this is completed, right click and put in forest information. Leave “uid” blank. Also look at your compartment structure, some of the information can only be added as numbers. Look at your compartment structure.
Split compartments
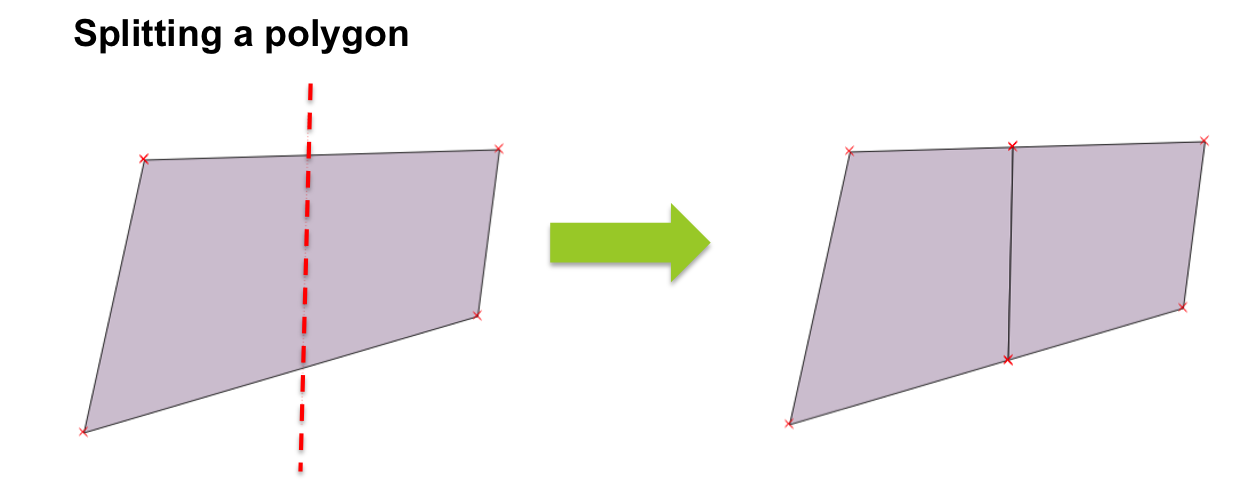
Use the split features in the Advance Digitizer Toolbar
- Editing must be enabled (Toggle Editing)
- Click on the Split features
- Draw a line from outside of the polygon, then entering the polygon, and finally exiting the polygon.
- Click with the right button of the mouse.
- If the split is successful two compartments are created.
- Make sure to update with compartment names and calculate area.
Expand or shrink existing compartment
- Editing must be enabled
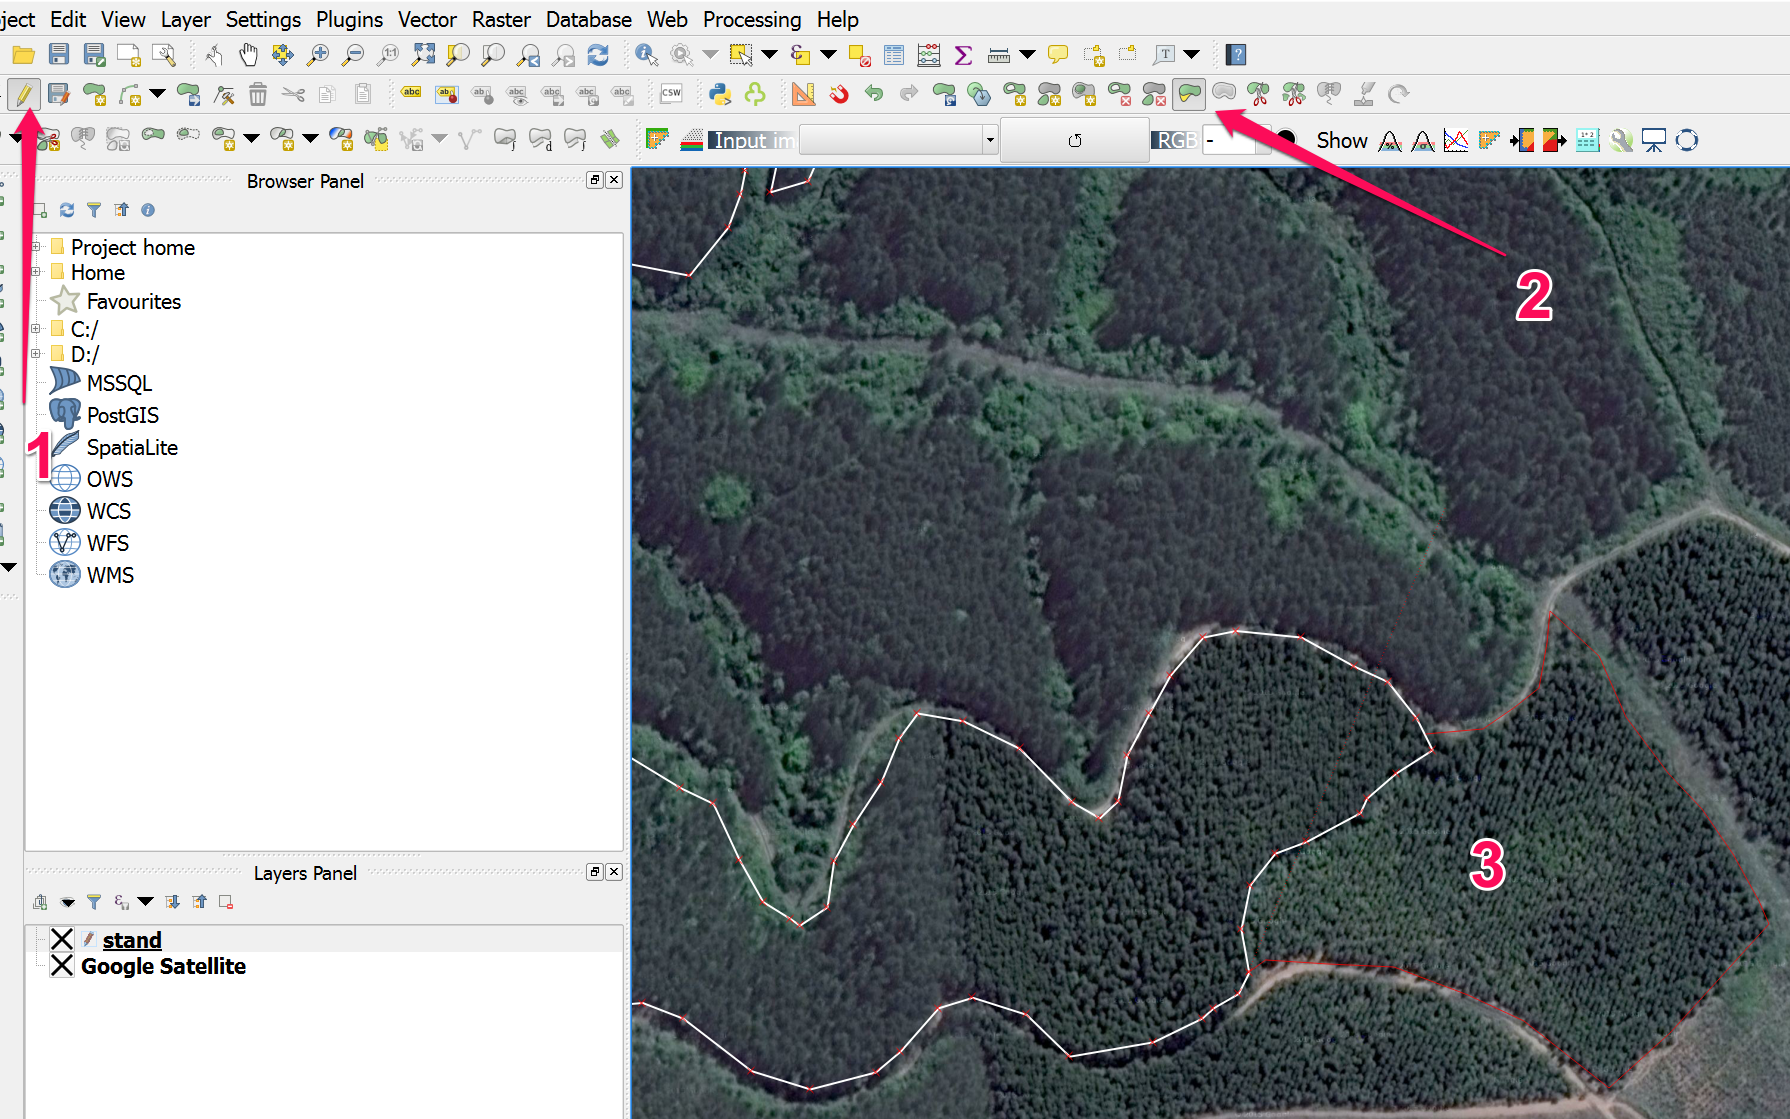
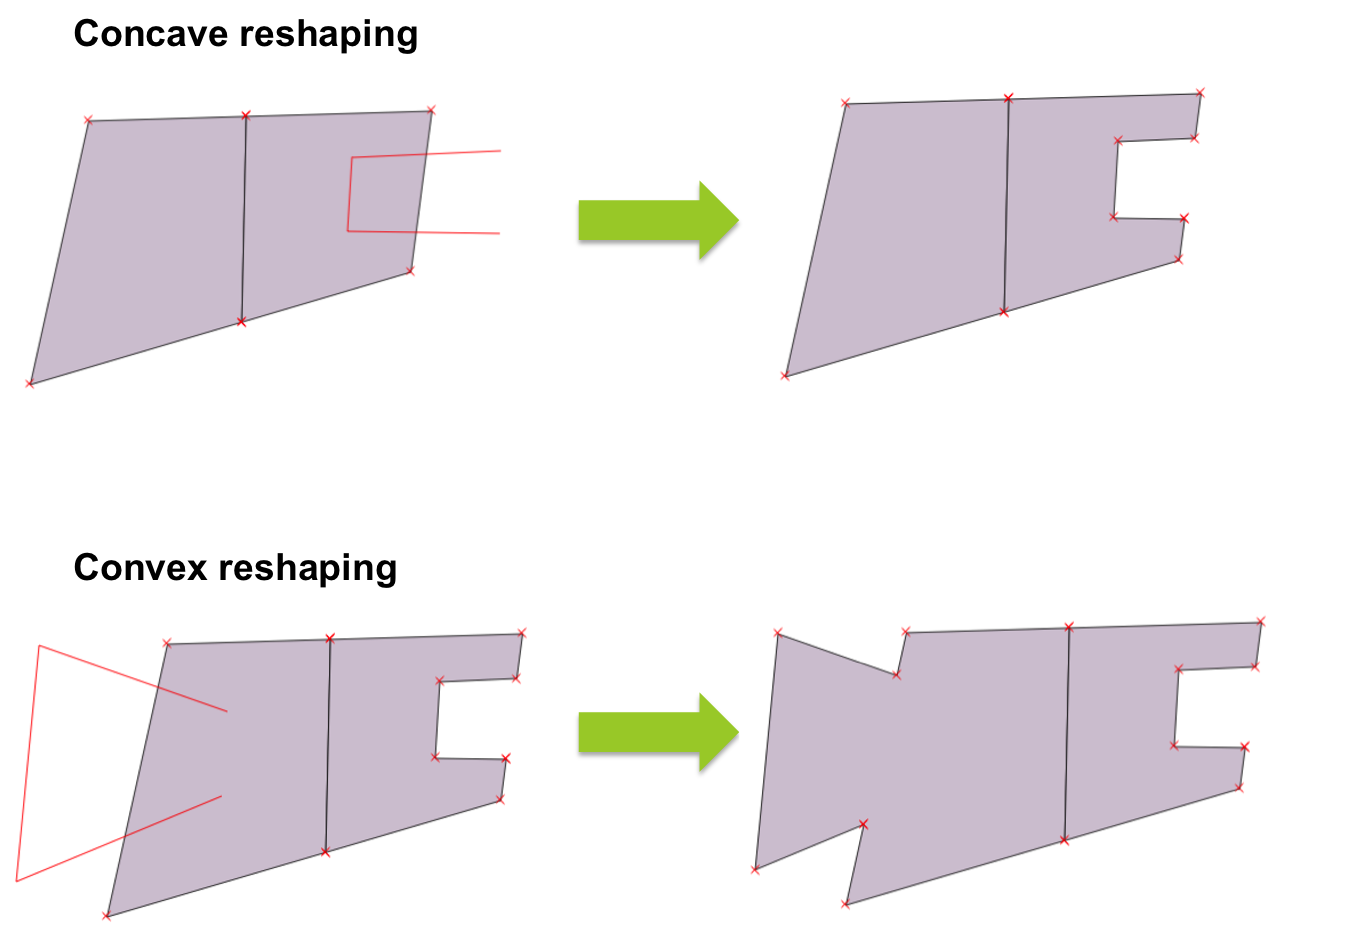
- Click on the reshape feature and mark the boundary you want to change.
- To create concave changes, draw a line beginning in the exterior of the compartment, then entering into the compartment, and finally in the exterior of the compartment.
- To create convex changes, draw a line beginning the in the interior of the compartment, then exiting the compartment, and finally in the interior of the compartment.
Merge two or more compartments
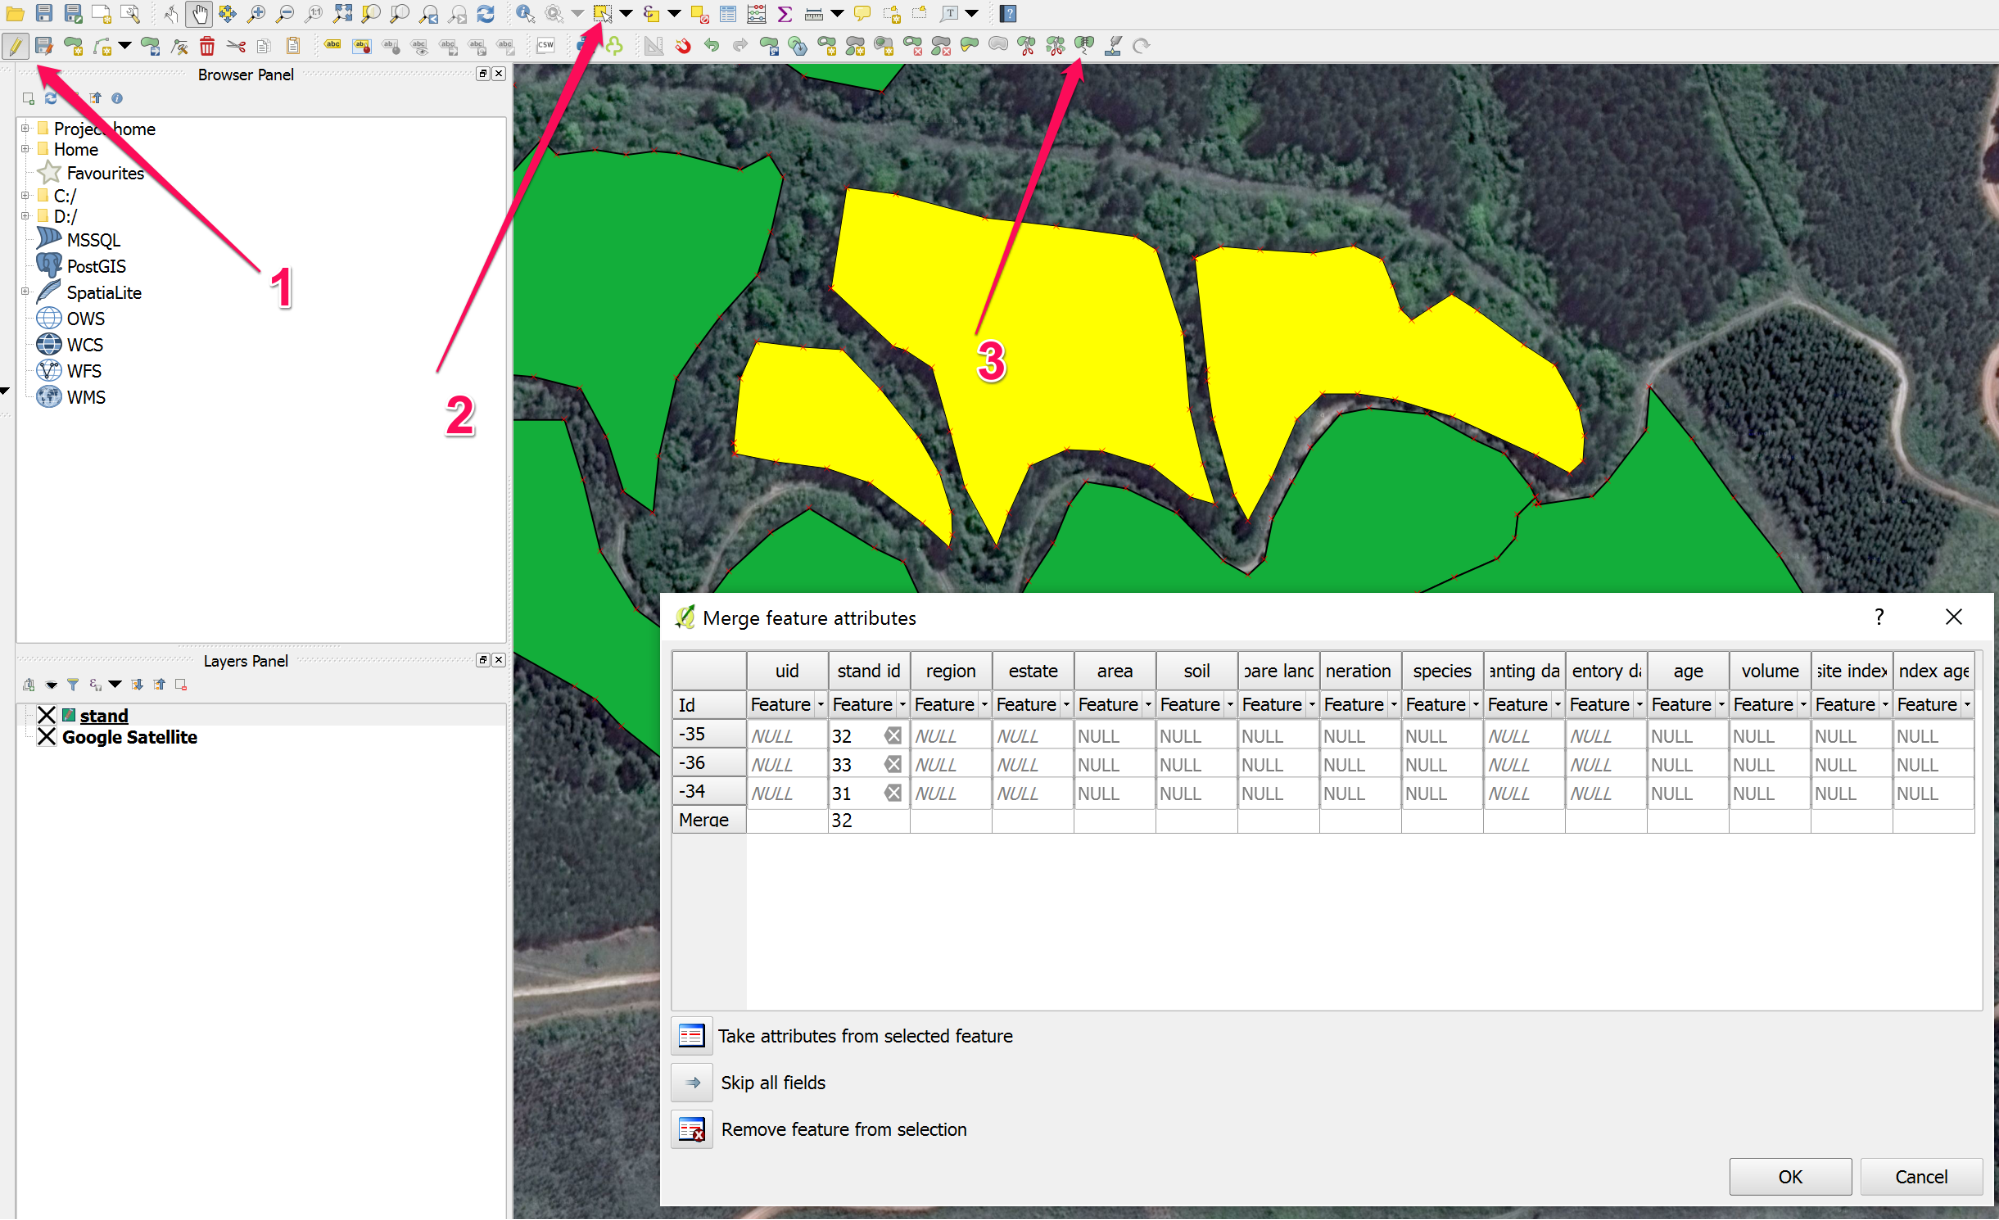
- Editing must be enabled (Toggle Editing)
- Select the stands you want merge, using the select function. (Ctrl + select)
- Click on the merge selected features.
Calculate areas (or other variables)
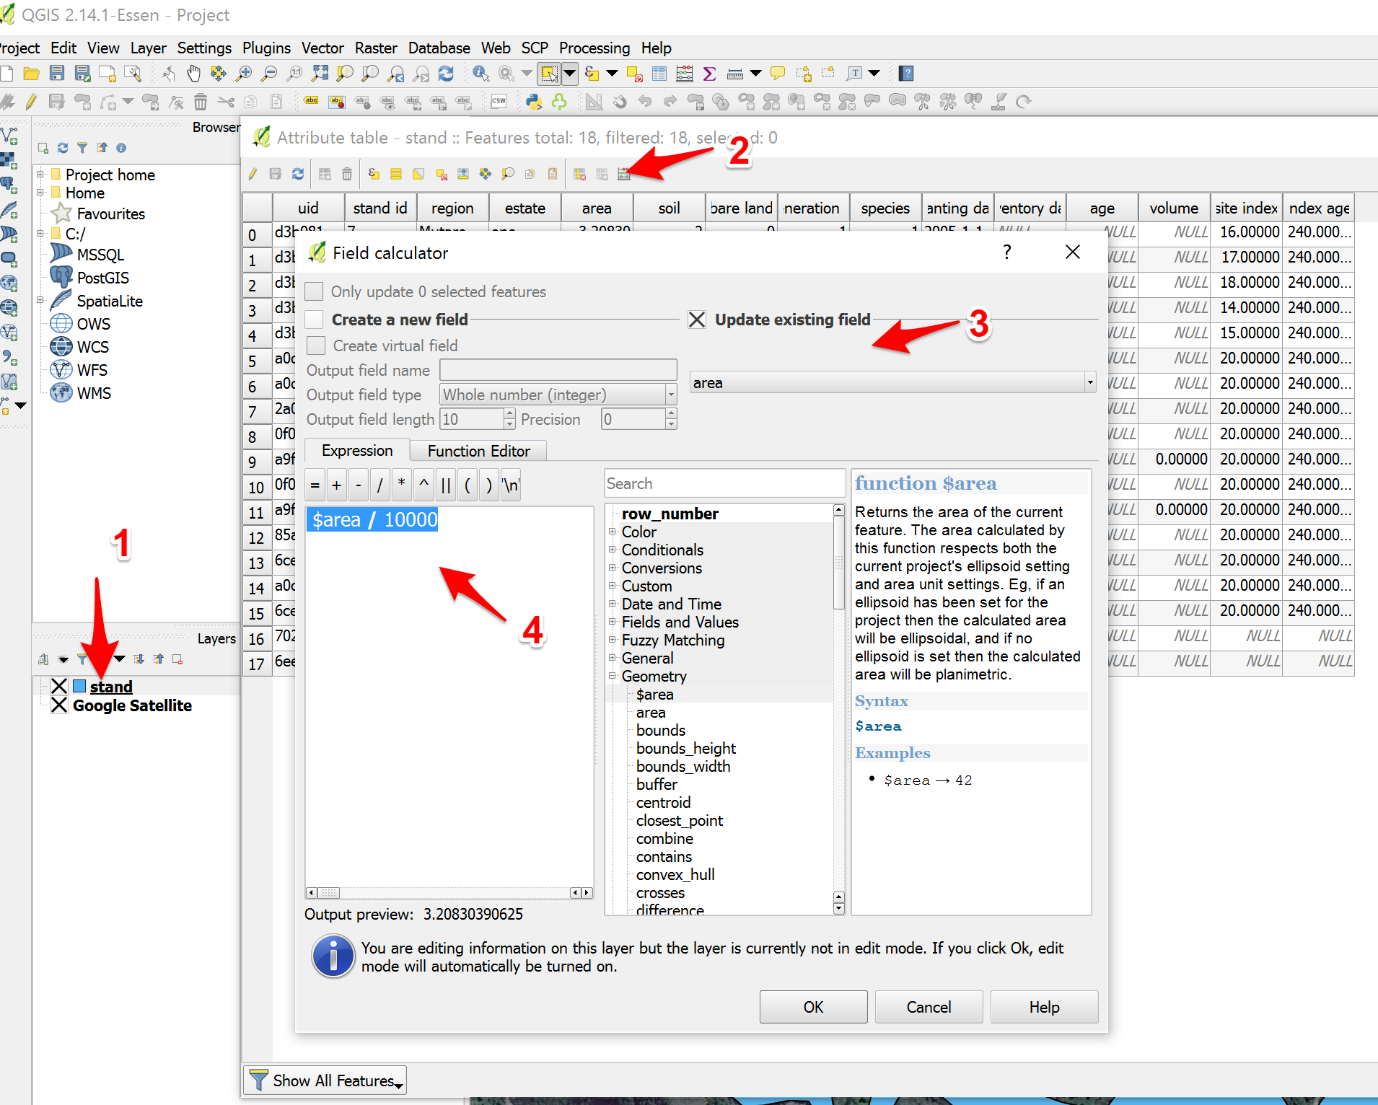
- Open the attribute table (right click on the layer and click on attribute table, in the example this is called stand)
- The attribute table shows a list of all compartments. Open the field calculator.
- In the field calculator, you are going to update the area which already exists. Click on the “update existing field” and select area from the drop down menu.
- The last step is to write the following expression $area / 10000. $Area calculate area in Square meters for hectare, divide by 10000. Click ok.
Delete compartments
Important: deleting compartments will also delete them in IPTIM. If you delete a compartment by mistake use the undo button or discard editing and start over again.
- Use the “Delete selected” in the Editing Toolbar
- Open attribute table and “Delete selected Feature”
Add Layer
After loading the compartment, you can add any GIS layer that you need. For example, Google Satellite images using the openlayer plugin, drone images, satellite images or any vector data. It is recommended to load additional GIS data after the QGIS connector has loaded the standing register, this is to eliminate any potential issues with projection and datum
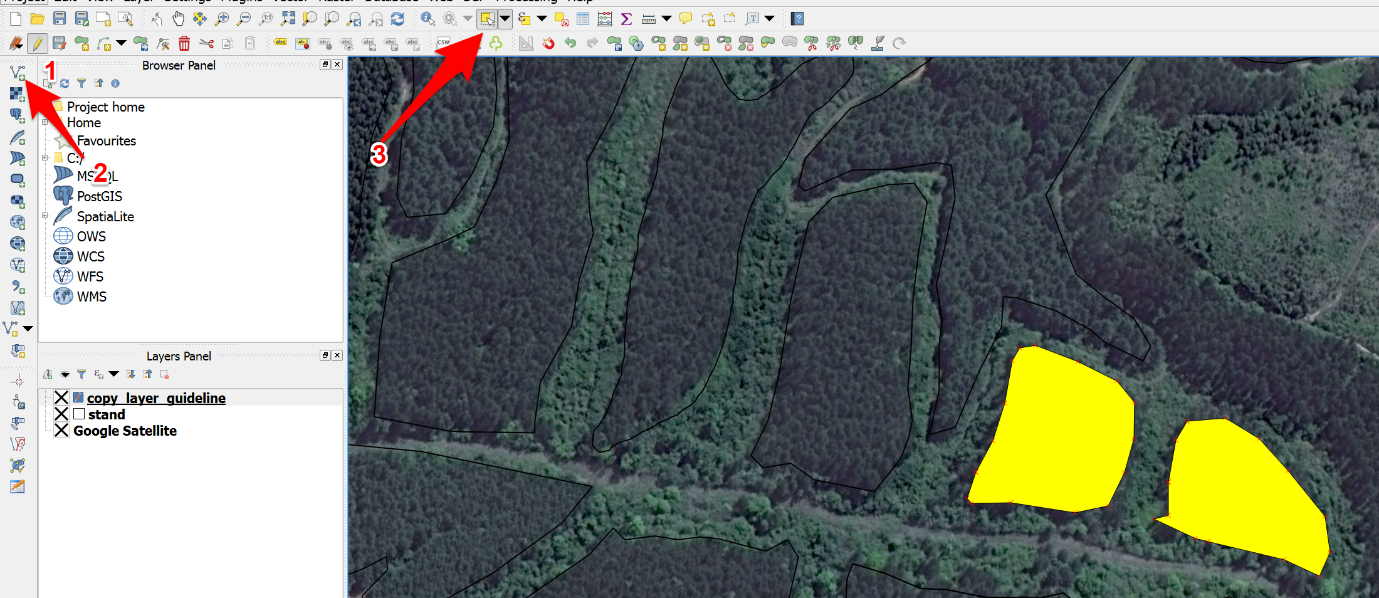
Copy compartments from another layer
- Editing must be enabled for target layer (Toggle Editing)
- Load the layer where you want to copy data from. (use add data)
- Select you the compartments you want to copy from using the select tool, after selection copy using ctrl + c or the edit menu.
- Select the destination layer and ctrl + v. Only attribute information that is the same as target and source will be copied over.
Save and Upload
After updating the GIS data, the next step is to upload the changes:
- Check that all relevant compartment data is update
- Compartment names
- Species
- Calculate area
- Save.
- Open the QGIS connector window and click on “Save and Upload”. If you want to discard the editing, click “Discard and Unload”.
- If you get an error message look at the following the error log (View > Panels > Log Message panels). The QGIS Connector performs built in test before uploading data to the server.
Comments
0 comments
Please sign in to leave a comment.