
Introduction
The goal of the article is to give an insight how to make a simple harvesting plan and calculate NPV for a small forest of 102 ha with two species. There will be no need for import of data in this example. For IPTIM to run a scenario, it needs information on the area, costs, growth and prices. In short, we will first create data, decide what the growth is, choose the regime and finally put all together and analyse the result.
Data
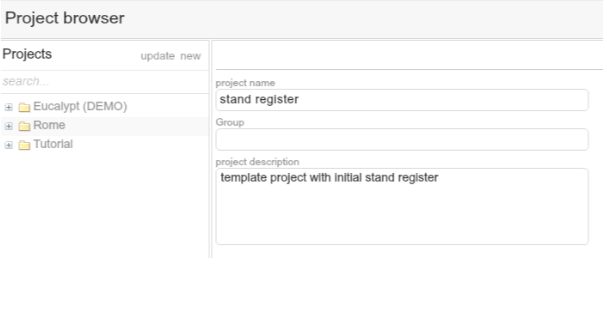
- Login into IPTIM can click on the Project. Create a new project, in this example; we will use an empty stand record. Click on new (1) > Copy template project (2) > stand register (3) and click select. For a more detailed overview of the project, browser looks at https://iptim.zendesk.com/hc/en-us/articles/201106693-Project-Browser
- A new window will open, give the project a name. There is also the option to group the project. To group put in the name of your group in the group field: Group.
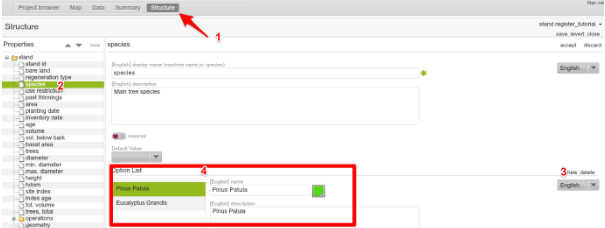
- After you have created your project, navigate to your project, under “Project browser” and click load (to the right). Then open data view, this should now be empty. Next step is to add two species navigate to structure (1). In structure, you will see an overview over all the variables that are in your stand register. Since our small project has two species, we need to add them to “species” (2), click on new (3) and put in the name of species and species description (4).
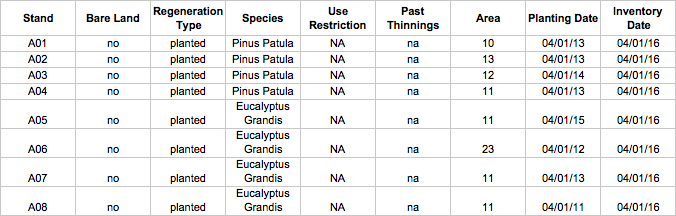
- The next step is to populate the stand register, navigate to data view, and then start entering the first line of data.
- Stand id (Put A01)
- bare land (no, drop-down list, change be changed under structure)
- regeneration type (planted, dropdown list)
- species (Pinus patula, dropdown list)
- area (10, this in hectare)
- planting date (put the planting date in the format of your computer)
- age (either put in the age manually or calculated automatically, by doing the following steps)
- Select the column (right click on age column, if successful the column will turn green, right click again on the green and select “fill cells…”)
- a window will open, enter the following code “ round(("xx/xx/xxxx" - planting date) / 365) ” and click fill. Note that date format can vary depending on your time and date setting on your OS.
- Continue all these steps for the remaining stands, alternative duplicates the first stand, by right click in the stand you want to copy, and click “duplicate row”.
- A second alternatively make a copy of the table and import using Excel. Look Importing Data
- After aggregated stand information, got to the summary tab to get an overview over your forest. Look at the Data Summary tutorial for a more in-depth walkthrough.
- Next step is to create a simple MAI model to set growth. Moreover, we assume different growth for the two strata of Pine and Eucalyptus. Go to the Model -> Growth and yield.
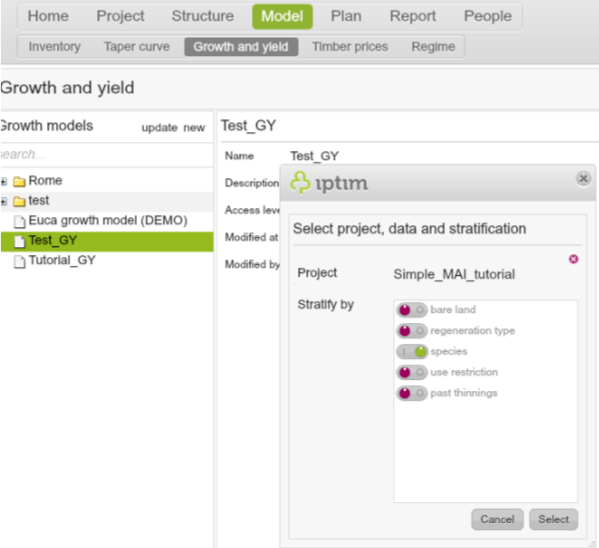
- Click on New, as project select the stand data loaded.
- Stratify by species
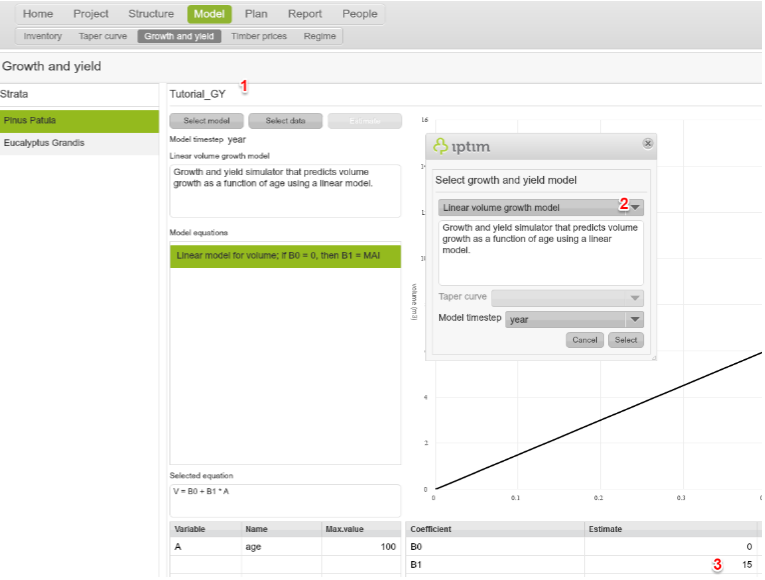
Modelling tool 1 - Under models, select the linear model (1 and 2), decide you MAI for each species (3) for 15m3/year/ha for pine and 20 for Eucalyptus.
Modelling tool 2
- Timber Prices the next step is adding timber prices. Location of Timber prices is under modelling. The timber price module is powerful with many of options, however, in this tutorial will only look at making two assortments pulp and saw logs for pine and eucalyptus.
Model -> Timber price -> click on new. Stratify by species and enter Sawlogs and Pulp, click on select.
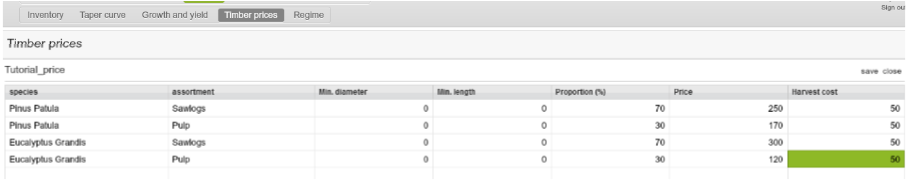
Since we are only using a simple MAI model, there will be no diameter output only m3, so no need to put in minimum diameter or minimum length. Enter the estimated proportion of sawlogs and pulp. In this example in assuming that 70% will be sawlogs and 30% pulp. Put in price and harvesting costs. The harvesting cost is per m3 while the harvest cost under regime is per ha.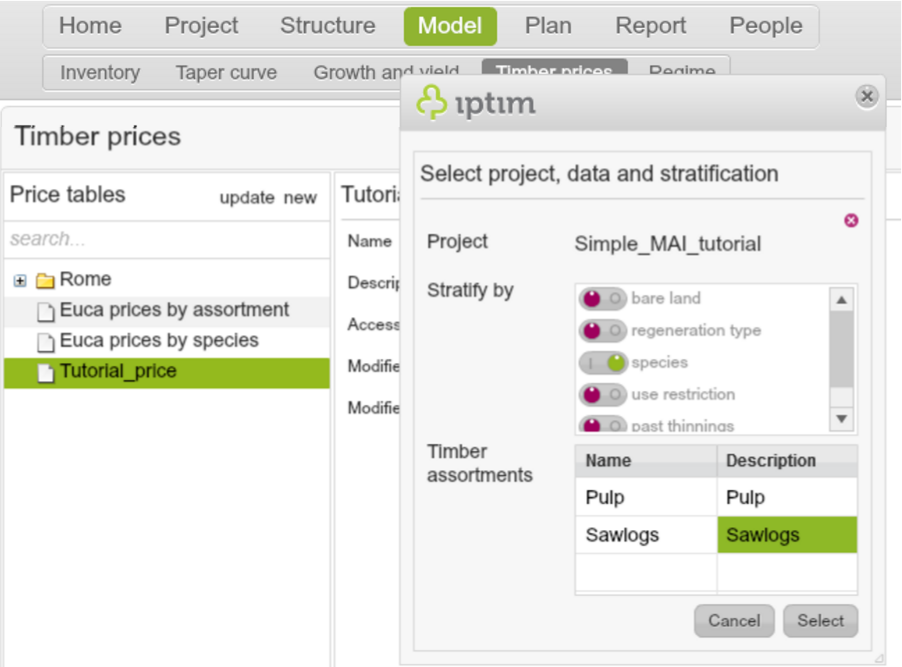
Prices 1
Prices 2 - The regime is the basis of the forest operations, here all the task and cost related to the regime is defined. You can create regimes by any variable defined in your stand table. For this example we use species.
- For the two species define the regimes activities
- Under harvest put in thinning and clear fell
- Under silviculture put in all silvicultural operations
- Transition, here you can set what you will do for your next rotation.
- Make sure you added species under the regime and that a clear fell date is defined.
- For a detailed instruction look at the tutorial Regime.
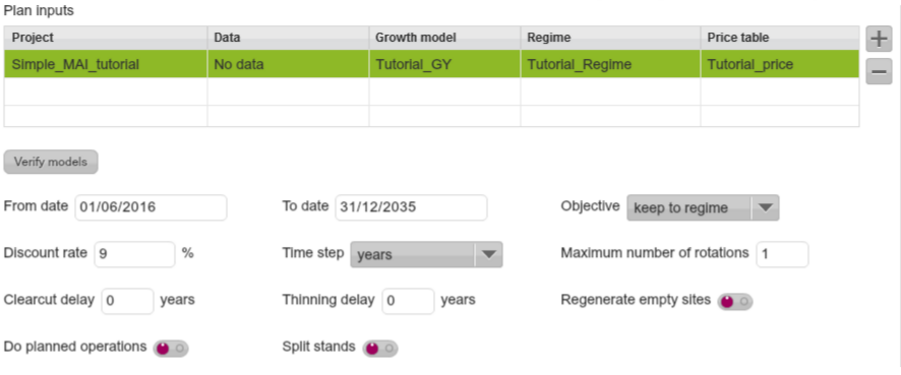
- The final step is to put everything into a plan. Go to plan, select new and name your plan. Open by double clicking on the plan this will open the overview window where you can add all relevant data for the plan. Click on the plus (+) to add Project, add all the following:
- Project – use the name you save
- Growth model – use your growth model.
- Regime – use the regime you created.
- Price table – use your price tables.
- Configure the plan.
- From date to date, decide when the plan will start, change to 1 July 2016
- The objective of the plan, two choices, “keep to the regime” all operations will be done strictly according to the regime. The second option is “maximise NPV”, then IPTIM will try to maximise the NPV using the constraints. For this scenario, we want a steady annual wood flow, so by setting a minimum volume to harvest per year
- The discount rate, used for NPV calculation, see this to 9%. The discount rate is real.
- Do planned operations, do the operation in your regime. Toggle this. We want the cost of the regimes included.
- Split stands, allow partly felling of a stand, toggle this.
- For the constraints to work there must be some flexibility when harvesting, therefore, add the option of a clear cut delay of 5 years.
- Look at the Plan tutorial for a more detailed walk through of all the different options.
- Under constraints, you can define goals for the plan. In this example plan, I want a minimum of 2500m3 per year. So I need tell IPTIM that harvests must not exceed 2500 per year.
- First, click on Variable and select Harvesting volume
- Next enter 1 in From (year) and 2 in To (year)
- Factor as 1 (Since we do not want to constrain the harvest)
- Under </> Put in less than (<) and value as 2500
- Next step is to copy this for the next 20 years. Click the copy button. Set Number of copies to 20 and increase time step by 1. Click copy.
- Verify your plan. The verification process will check all your inputs running a 1 ha scenario and gives the estimate NPV and growth prediction. If the model fails to verify, this is most likely related to some data not entered correctly. Check the following
- Data (Most probably not an issue)
- Do you have a plant date?
- Growth and yield,
- Is growth specified for each stratum
- Regime,
- Do you have a fell date?
- Are species defined under silviculture in regimes?
- Prices
- Is price determined for each stratum
- Plan
- Did you add discount rate?
- Run the plan, go to plan, select the plan and click run in the right corner. It will take some time depending on the complexity of your plant. If the plan fails to run, look at the warnings and errors.
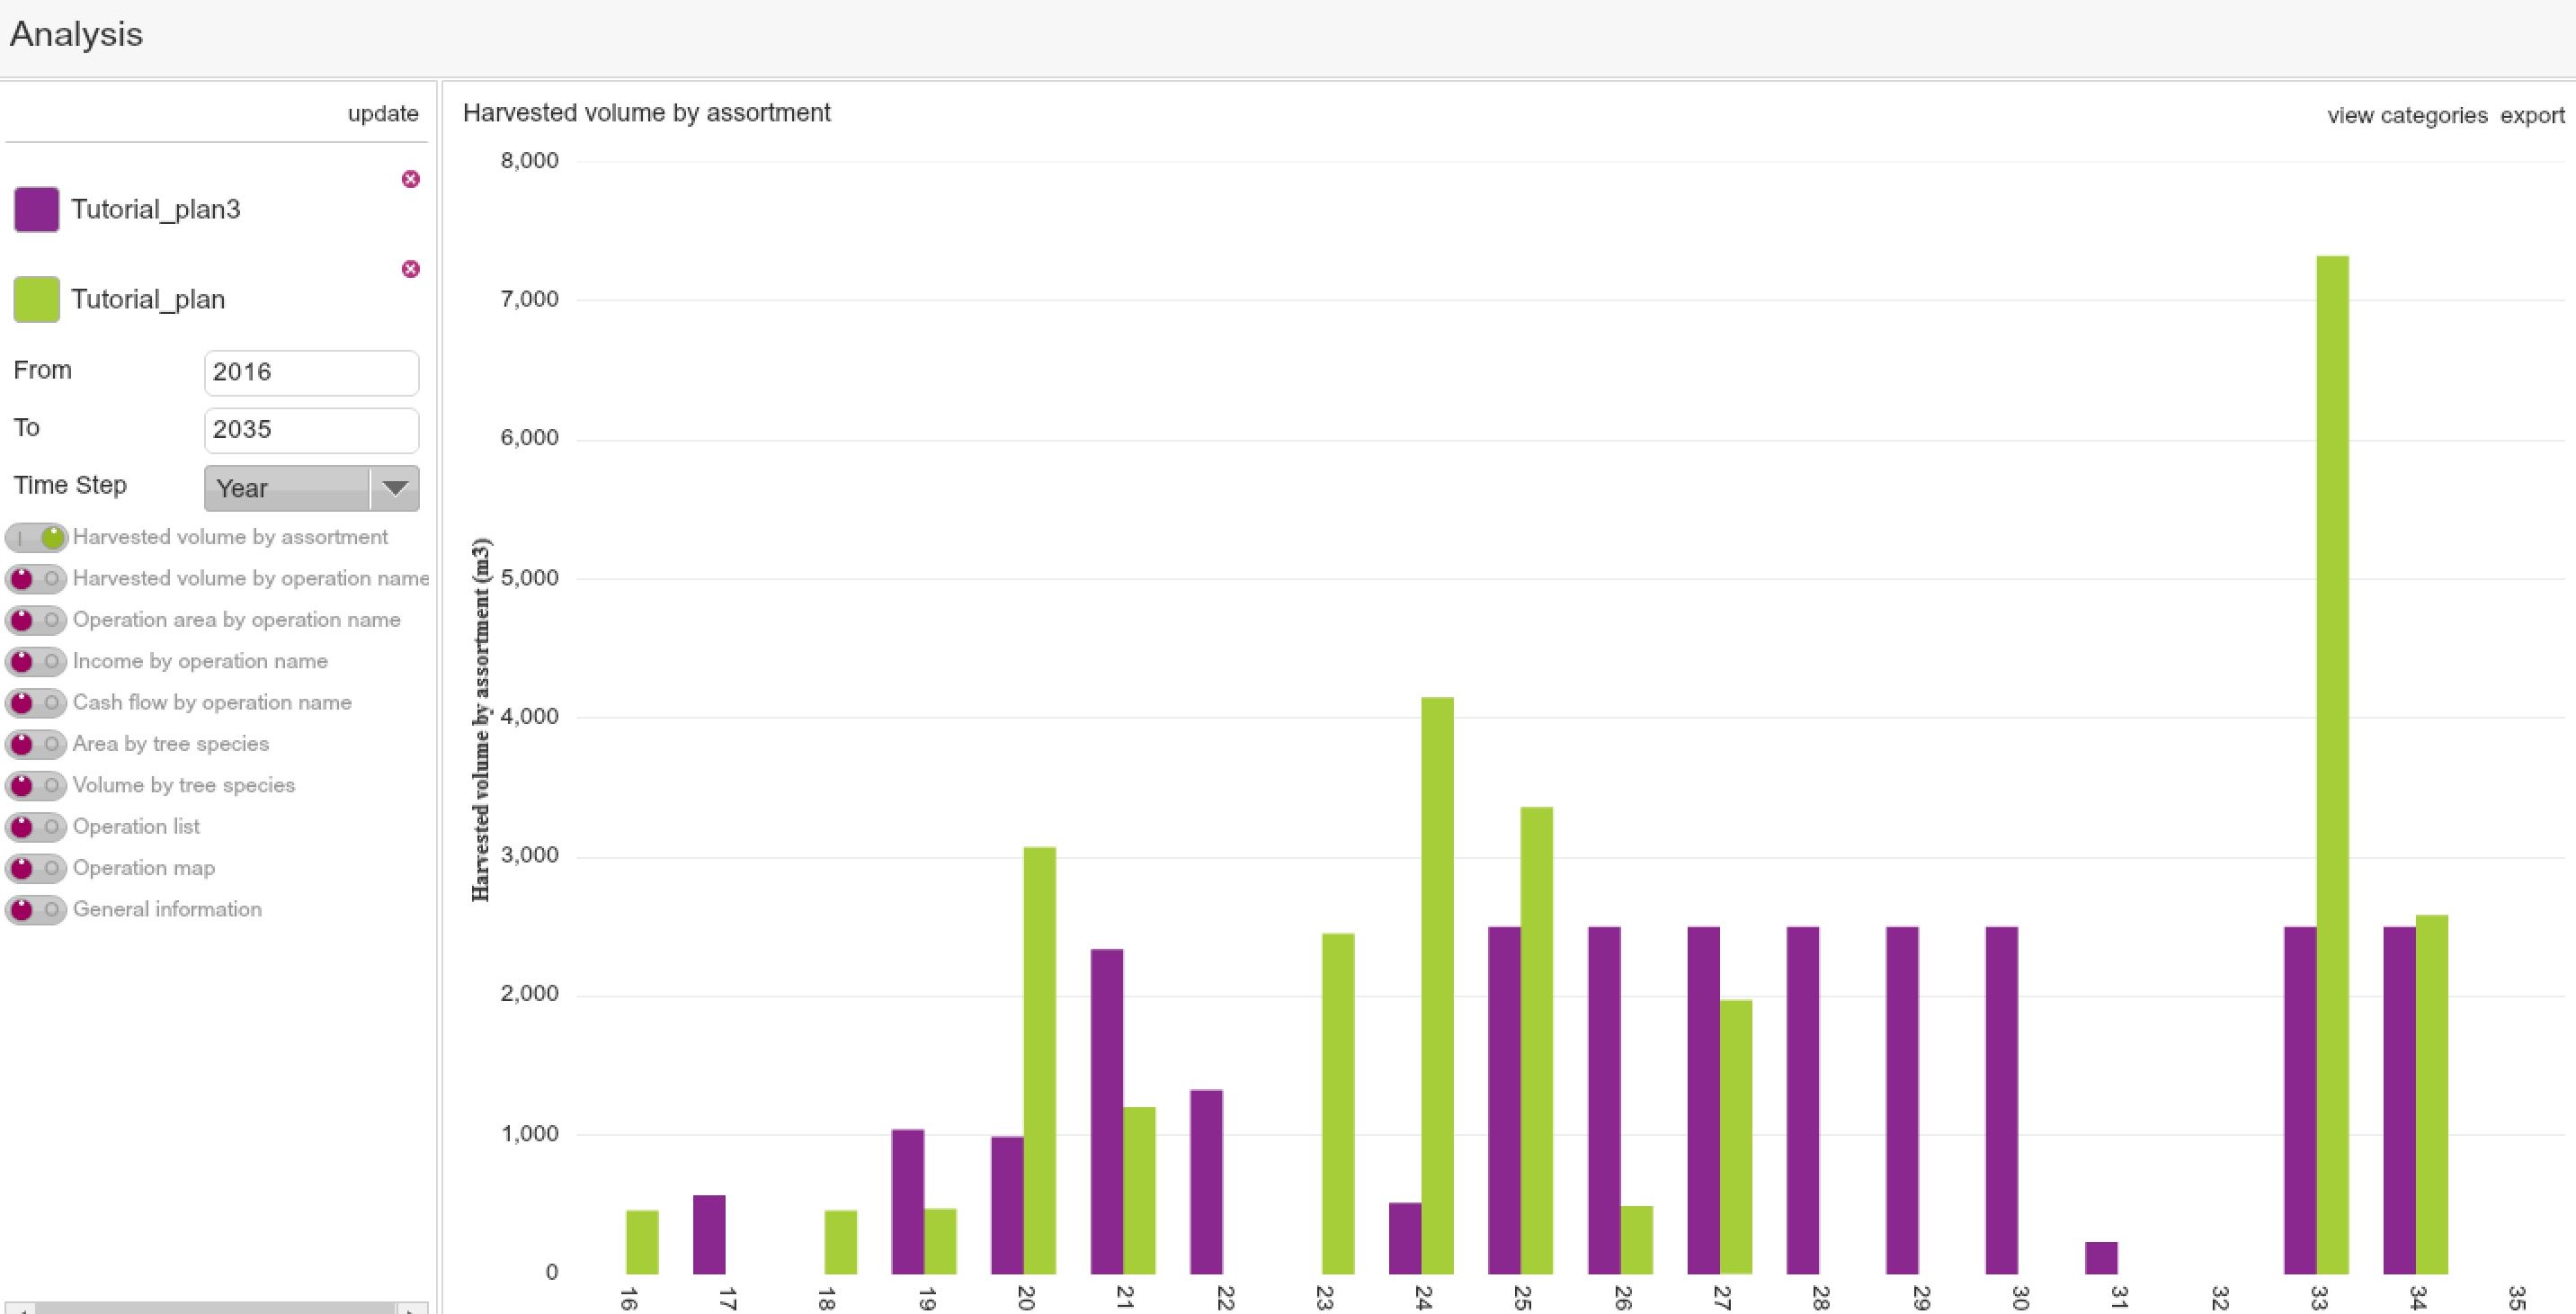
- The analyse of your results, for an introduction, look at Analysis. Click on analyse under the plan. Select the plan on the top left, and if you want to compare plans, add the second plan below. The screenshot below shows a comparison between plan3, which has a harvesting constraint and no construction.
Comments
0 comments
Please sign in to leave a comment.